For this tutorial, GroundWiz Full version is required.
Load tutorial file 'gwTut5_skitrails.max'. (This file is included only in GroundWiz Full version.)
The idea is to build ski trails in the forest, using GroundWiz Terrain Map and GroundWiz Planter. It may sound simple, but many graphic artists would know how exhausting and time consuming to create a natural looking terrain map and furthermore, place millions of trees, stones or grass precisely where needed. GroundWiz will help you create a nature scene with much ease and flexibility.
Step1: Importing Terrain
After deciding on which mountain to build a ski resort (for those who care this one is in Utah), I imported a 3DEM terrain chunk into 3ds Max. Read about importing terrain data in the previous Tutorial: Importing Yosemite Park into 3ds Max.
Step2: Adding Layers
I created different GroundWiz Terrain Map layers of rocks and snow for the imported mountain:
- 3 layers of rocks used for color variation (for close-up, image map was used for color and bump map on all the rock layers).
- One snow layer for the peak area where snow is less full than lower mountain areas.
- Another 3 snow layers for color variation (dirt and ice) below the peak areas.
The following is settings for each layer:
1.RockGray
StretchUp: 10
Color: R87 G87 B87 / image map value: 10
Bump Parent Influence: 100
Bump Strength: 120
Bump Detail: 50
Distribution Amount: 100%
Distribution Noise: 0%a.RockGreen
StretchUp: 10
Color: R45 G48 B42 / image map value: 30
Bump Parent Influence: 5
Bump Strength: 170
Bump Detail: 55
Distribution Amount: 75%
Distribution Noise: 20%
Slope Limits: Max-75, Transition angle-15a-1. RockBrown
StretchUp: 10
Color: R57 G45 B35 / image map value: 25
Bump Parent Influence: 30
Bump Strength: 150
Bump Detail: 60
Distribution Amount: 50%
Distribution Noise: 25%
Slope Limits: Max-65, Transition angle-10b.SnowTop
StretchUp: 1
Color: R255 G255 B255
Bump Parent Influence: 5
Bump Strength: 35
Bump Detail: 40
Distribution Amount: 50%
Distribution Noise: 50%
Altitude Limits: Max-450, Transition angle-70
Slope Limits: Max-60, Transition angle-10
c.Snow
StretchUp: 10
Color: R255 G255 B255
Bump Parent Influence: 10
Bump Strength: 30
Bump Detail: 30
Distribution Amount: 90%
Distribution Noise: 35%
Altitude Limits: Max-500, Transition angle-70
Slope Limits: Max-65, Transition angle-10
c-1. SnowDirt
StretchUp: 10
Color: R47 G47 B39
Bump Parent Influence: 10
Bump Strength: 50
Bump Detail: 60
Distribution Amount: 20%
Distribution Noise: 35%
Slope Limits: Max-20, Transition angle-10
c-2. SnowIce
StretchUp: 10
Color: R225 G250 B255
Bump Parent Influence: 10
Bump Strength: 30
Bump Detail: 45
Distribution Amount: 35%
Distribution Noise: 15%
Slope Limits: Max-30, Transition angle-12
Of course, since rocks are likely to be rough and bumpy, I used big bump strength for rock layers. On the other hand, small Parent Influence and Bump Strength were used for snow layers: snow should look soft and smooth.
Step3: Forest Layer
After creating texture map for the mountain, it was time to add many trees and basically create a winter forest. I created a layer where all the trees would be placed. Since the terrain was big, I just wanted to focus on a specific area for ski trails. For this, I used limit map to specify the forest area.
In the following preview picture, the dark green area is where trees will be planted. You can adjust parameters like Slope and Altitude Limits for this forest layer. In the tutorial file, turn on 'Forest1' layer and press 'Grab' to see the preview.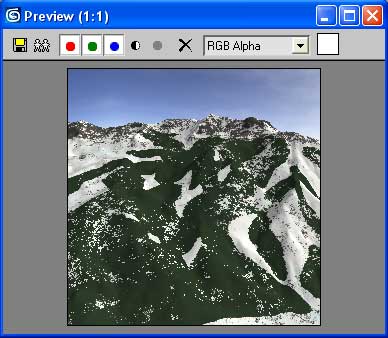
Using 'Current Preview' window, you can check whatever changes you make on the forest layer, which will be used for placing trees.
Step4: Planting Trees
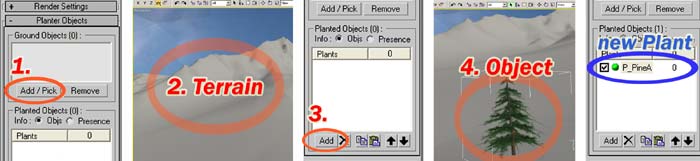
Now it's time to create a GroundWiz Planter to place trees. To create a GroundWiz Planter, go to Create/Geometry. Select GroundWiz in the list and then click on GW Planter. Create a GW Planter in the scene and then open newly created Planter in the modify panel. To be able to start planting, terrain object needs to be added to the Planter's 'Ground Objects' list and some plants to the list of Plants.
To be able to start planting, Terrain has to be set up and Plant object has to be created.
In my case, to have pine tree forest, I created one plant with 3 LOD (level of detail) objects. Maximum Visibility of each LOD object in top-down order was set to 15, 7 and 0 respectively.
Before planting, I adjusted parameters: Orientations, Scale and 'Density per Unit' of trees, to make instances of planted trees look different. I also turned on 'Collisions' option and 'Do self collision' to make plants avoid colliding with one another. In the tutorial file, check 'GWPlanter_forest' object to see the parameters.
GroundWiz Planter has an option to plant trees on terrain areas that are showing some specific (named) GroundWiz layer. In Setup Collisions/Layers panel, I typed in 'Forest1' and added it to the GroundWiz Layer Limits list. If you'd like to have trees planted more randomly and naturally along the border line of 'Forest1' layer, increase Sample Size and adjust Layer Intensity Influence. In my case, I used default settings, so trees were placed more precisely along the layer border.
It is important to remember that GroundWiz map has to be applied to a material that is in turn applied to the Ground Object for 'GroundWiz Layer Limits' to work.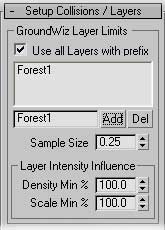
After setting up all the parameters, it was time to finally start the planting process. Automatic planting was done by pressing 'Plant Now' in the Planting Tools panel.
If the planting area was small enough, you could use Brush Planting mode to plant objects. Simply dragging a brush over the specified layer where objects are to be placed would plant thousands of objects.
After planting process was done, I disabled layer 'Forest1' in the GroundWiz texture map, since it wasn't needed any more.
Planting trees on 'Forest1' layer that doesn't have ski trails yet.
Rendered image (mental ray in my case)
Step5: Forest with Ski Trails - Replanting for the second time
In the previous example, we rendered the image after placing trees with a help of a GroundWiz map layer 'Forest1'. That layer didn't have any ski trails in the limit map. In this second example we used GroundWiz map layer 'Forest2'. In this case image that was used also had ski trails added with a paint program.
Layer 'Forest1' limit map without ski trails
Layer 'Forest2' limit map with ski trails


Before replanting the pine forest, go to 'Setup Collisions/Layers' panel and replace string 'Forest1' with 'Forest2' in the 'GroundWiz Layer Limits' list.
Secondly on the 'Planting Tools' panel, remove all the plants with the Clear button.
And finally start the planting process by pressing 'Plant Now' button.
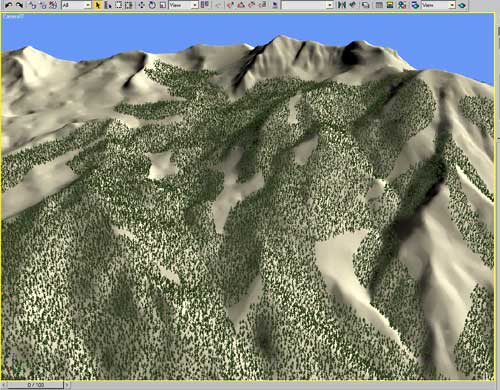
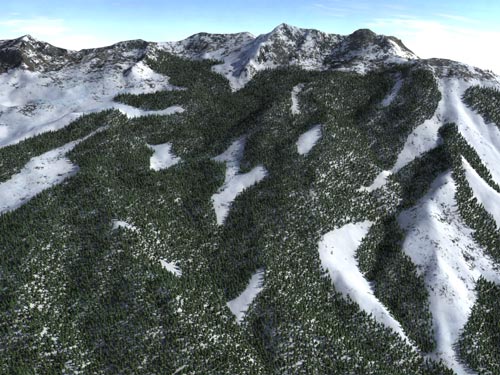
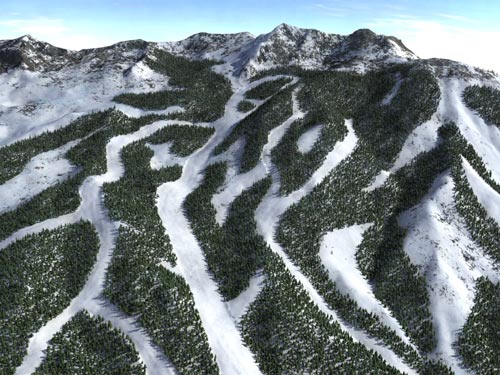
Planting trees on 'Forest2' layer that has ski trails.
Rendered image (mental ray in my case)
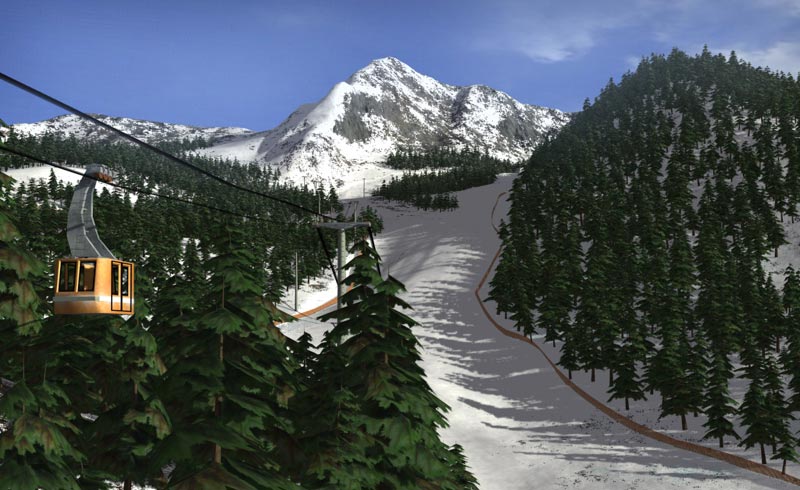
After planting is done, you can still modify the scene. For the image at the beginning of this tutorial, I used 'Detailed Planting' option to delete and move some trees on certain areas so that I could create the ski trails the way I wanted.
Other than Mass Planting, Brush Planting can be used. A brush tool may be very flexible and detailed to create and modify ski trails.
Step6: Placing Objects on the Terrain
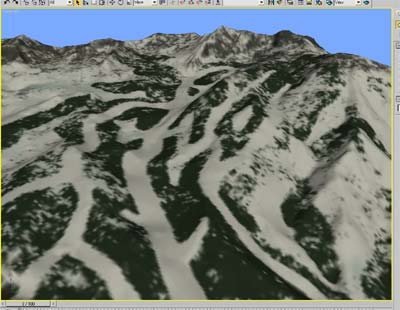
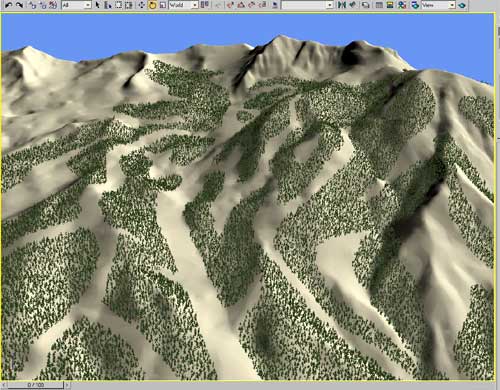
To be able to place objects along the ski trails, I used 'GroundWiz Viewport Texture' feature. This allowed me to see GroundWiz map in viewport so I could place some objects like safety net and cable cars precisely along the trails.
Interactive view of the terrain in viewport
Tip: When working with GroundWiz procedural map, Preview Window is used to create and fine-tune GroundWiz layers. Once you start placing objects on the terrain, you can use Viewport Texture feature to see GroundWiz map in viewport. This feature is otherwise not meant to replace Preview Window since redrawing texture can be a slow process.
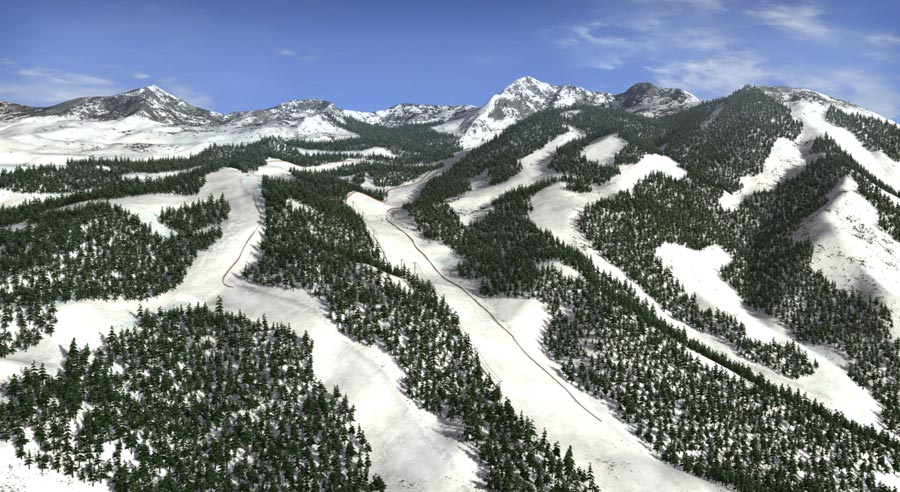
And some final renderings...