 |
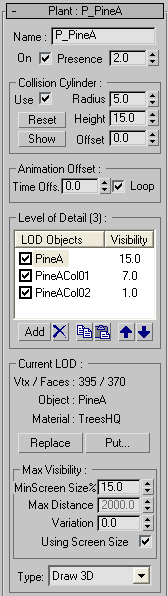
This panel is used to adjust all settings for the currently selected plant.
Name - Shows the name of the currently selected plant. You can change the name for your convenience.
On - When enabled, the plant can be used. This is the same as enabling checkbox on Planted Objects panel.
Presence - Sets up how likely it is that the current plant will be planted compared to all other plants in the current Planter. This number is relative, depending on what number you type in for other plants. The percentage presence in Planted Objects / Info panel is calculated from this value.

Collision Cylinder - When testing for collisions to avoid overlaps while planting, each planted object is treated as a cylinder internally. Here you can set up collision cylinder radius, height and offset for the current plant.
When a new plant is created, default cylinder is set up based on a bounding box of an object used to create the plant. You should adjust these parameters, depending on how big you'd like to make collision area for each plant. In case of trees, it may be better to have radius around the trunk and not the end of branches. You may set small radius for grass if you'd like to have grass a bit overlapped so that it looks thick.
Use - When checked, the current object will be considered for collision in time of planting.
Radius - Sets collision cylinder radius.
Height - Sets collision cylinder height.
Offset - Sets collision offset from the pivot point in the local Z direction. Positive value will push the collision cylinder up and negative down from the object's pivot point.
Reset - Allows you to quickly reset cylinder to the default size that is calculated from (highest LOD) object's bounding box.
Show - While pressed, it will display current collision cylinder in viewports (instead of planted objects).

Animation Offset - You can use this feature to produce more natural 'out-of-sync' animation of many objects. Read more about it in the section of Technical Overview.
Time Offs. (Offset) - Allows you to specify how far ahead in time plant's animation can be from the current animation time. At the default setting of 0, all objects will move identically. The bigger the value is, the more differently all objects move.
Loop - When Looping is on, 'Animation Offset' will be looped around based on current settings for Animation Start/End Time. It's useful with looping animations.
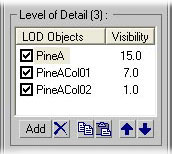
Level of Detail (LOD) - Each plant has a list of objects that will be shown depending on the distance from the camera. There should be at least one object in the list, but any number is possible. The object at the top of the list should be the most complex one while the one at the bottom the simplest one. You can disable LODs that you don't want to use by unchecking the checkbox next to the LOD name.
Add - Adds/picks LOD objects. You can add as many LOD objects as needed.
X - Deletes the selected LODs.
Copy - Copies selected LODs to the internal clipboard (this way it is possible to copy LODs even to another Planter).
Paste - Pastes copied LODs from internal clipboard.
Arrow UP & Down - Moves selected LODs up or down in the list.
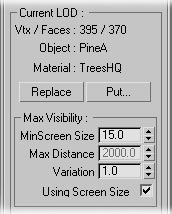
Current LOD - The basic information on the current LOD object is displayed.
Vtx / Faces - Shows the number of vertices and faces of the current LOD object.
Object - Shows the name of the current LOD object.
Material - Shows the material name of the current LOD object. If the current LOD is replaced with a new LOD by using Replace then material also gets replaced.
Replace - Allows you to replace the currently selected LOD with a new LOD. In this case, all other settings for the LOD you have already adjusted stay the same. The following things will be copied from the picked scene object: a reference to object, a reference to material and pivot point position. Read more about it in Planter Technical Overview.
Put - It puts an instance of the current LOD object into the scene where it was found originally, together with its material. This is useful when you need to modify the current LOD. If you edit the LOD, all the instances of the LOD in the planter will change automatically.
Tip: In case you apply a different material to an instance of the current LOD object after putting it back into the scene, Planter won't change the material to the new one. To apply a different material, you should use 'Replace' option.
Max Visibility - Visibility determines when the LOD object will get replaced by the one lower in the LOD list (usually lower in the list means less complex one).
There are 2 ways to determine LOD visibility:1. Screen Size mode will calculate visibility based on the bounding box diagonal length compared to screen diagonal length.
In the following example, there are 4 LODs setup for the plant and for each LOD we set up Min Screen Size in the following order : 35%, 20%, 10% and 5%. That would make LOD1 be replaced by LOD2 when its bounding box diagonal length is less than 35% of the screen diagonal length. The same rule applies to other LOD object, the lowest one would disappear when size gets smaller than 5%. If you don't want the lowest LOD object to disappear, set its Min Screen Size to 0.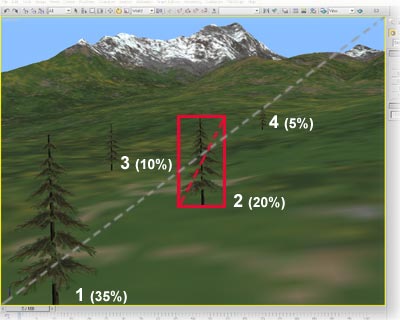
Tip: Using 'Show Safe Frame' in viewport is the only way you can be sure what LODs will be shown in the final rendering. So when adjusting LOD objects in Screen Size mode, make sure you turn on 'Show Safe Frame'.
2. Distance Based LOD selection is easier to set up and understand but harder to control. As the name suggests, LOD selection is only based on the distance from the camera. Problem is that this mode doesn't consider the size of the object on the screen. Thus, if you start changing camera's FOV (field of view) angle or view's aspect ratio, all the settings will need to be readjusted.
Max Visibility group has the following options:
Min Screen Size (%) - Sets up the minimum screen size parameter for the current LOD. It is useful only when LOD visibility is calculated based on the Screen Size. Read above for the explanation.
Max Distance - Depending on the distance you set up, the current LOD is replaced by the LOD lower in the list. It's useful only when LOD visibility is calculated based on the distance. Read above for the explanation.Note:Distance LOD is an approximation in non-perspective views - user, left, right, top and bottom - because in those views distance is not well defined and is affected by zoom amount. So for the final rendering, it's better to set up LODs in perspective view.
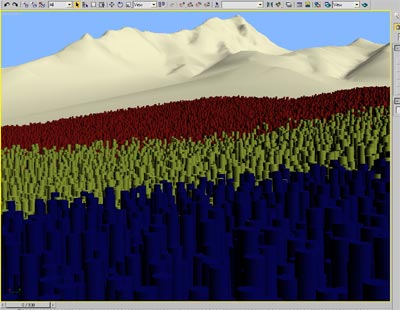
Variation - This option gives some variation to Screen Size and Distance. Depending on 'Variation' percent, it randomly moves up and down the value of Min Screen Size and Max Distance. Without this option, it may be too obvious that LOD objects pop up all together where Screen Size or Distance is set up. It is quite useful particularly when making animations. If you have good LOD objects, the transition between different LOD objects will be smooth, so you can leave 'Variation' to 0%.
Variation 0: the transition between LOD objects is a clear horizontal line.
Variation 7: the transition between LOD objects is more random and varied.
Using Screen Size - Toggles between the Min Screen Size and Max Distance modes. This switch applies to all plants in the current Planter (it is here only for convenience). Read more about both modes above (Max Visibility paragraph).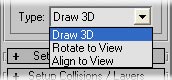
LOD Draw Type - Gives you options on whether or not LOD object is always facing or rotated towards the camera. LOD objects can be drawn in 3 different ways. 'Rotate to View' and 'Align to View' are usually used with billboards to make the space look fuller without using too many polygons. Note that each LOD object can be drawn differently, so it is possible to use billboards only when plants are far away.
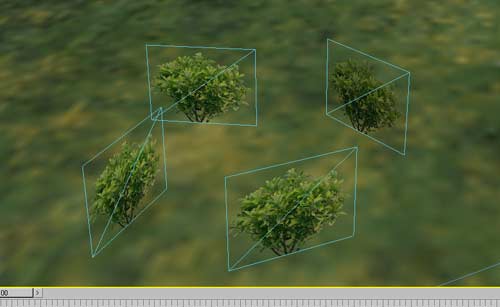
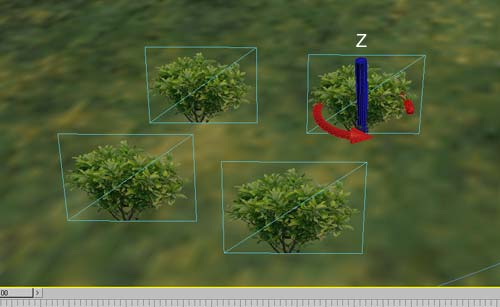
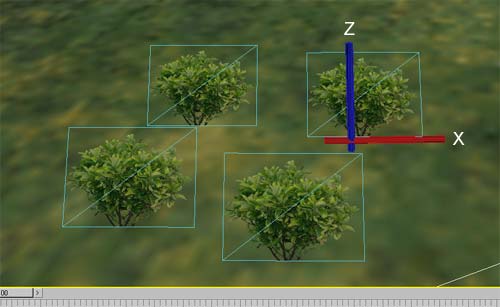
When using 'Rotate to View' or 'Align to View', make sure that the pivot of the selected plant is adjusted so that Y axis is pointing to the back of the object as shown in the following picture.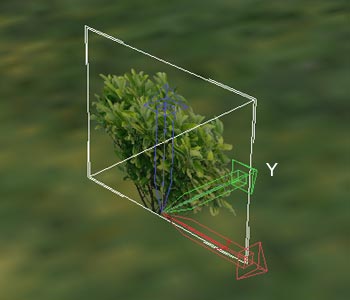
Draw 3D - This is a standard option. Plants stand the way they are placed.
Rotate to View - Plants rotate towards the camera around the Z axis.
Align to View - Aligns objects with the camera. That is, plants always face the camera. Even if the view is top, all the plants will stay aligned with the camera.